Saturday, July 30, 2011

Fat Quarterly Issue 6 is here - check out my Churn dash Designer Challenge contribution!


Do you know about Fat Quarterly?  I'm guessing if you are reading this post that there is at least a 50-50 chance you do.  It is a fantastic online quilting magazine that I discovered in the past year here since I've been active in blogland and I bought all the back issues and a subscription.  I've enjoyed every issue and made a few of the projects (and have several more queued up)!

Quite a while back, I submitted a project to the Fat Quarterly Reader Challenge - the Circular Logic Pillow. And I won the small project category (!!) which still blows me away. I do love that pillow.  The pillow was shown in Issue 5 of FQ. I was honored and thrilled to say the least.

Anyway, shortly after that the editors asked if I'd be willing to participate in the Issue 6 Designer Challenge feature - this is a feature where a traditional block or other theme is assigned and then several quilters or sewists put together an interpretation of their own.  My submission was for the "Churndash" quilt block theme...and it's available now!

I know right? "Designer"?  Me? not exactly. But it was really fun and I actually do enjoy sketching out quilt blocks and quilts with my colored pencils (or in ink in the back of my notebooks at work during particularly long drawn out tele-conferences)

Here is a basic churn dash block diagram:


And here is my interpretation:


There is a pretty long explanation in the FQ Issue 6 explaining my thought process, but essentially I wanted to replace the HST corner units with quart circle units. Oriented like this, you can generate circles at the intersections of the blocks.  Below you can see how this looks with just 4 blocks. I haven't had a chance to build a whole quilt top yet, but I think I'll like it.  I already want to make a 2nd variation though that I'll call "Drunkards Churndash" because I think corner blocks that have more of the center portion print would look really interesting - but it would be a pretty different look.  When (if) I do, perhaps I can add a tutorial for the block and even possibly a whole quilt pattern (a first timer's version of one anyway).


The editors at FQ took the basic instructions I sent for these blocks and formatted them to be a pretty intelligible tutorial if you are really keen to see it in the meantime. Please go support Fat Quarterly and buy Issue 6 - there are so many great patterns using different fabrics than only quilting cottons (even a paper quilt that I love).   You can preview the issue first on the website if you aren't convinced.


cool.

Friday, July 29, 2011

Friday finishes (or "I owe it all to my insomnia...")

I had a real problem sleeping this week. Actually ever since I got home from New Jersey last Friday. I even tried drugs (Ambien) after watching TV, reading, playing mindless games on my iPod, and just lying there in bed thinking I should go to sleep. So a couple of nights ago I went to my crafty corner, cleaned up a bit and then dragged out all kinds of fabric into a big mess again to figure out something to make.

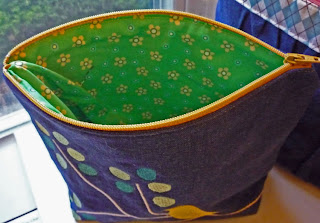
I have 2 zippered pouches to show for it now. Both just made up more or less based on some skills I built following tutorials. My favorite pouch tutorial is this one from Noodlehead.

For this first one, I used the dimensions and instructions for that pouch in the tutorial, but instead of patchwork, I stitched out this little bird on a branch embroidery (from Meringue Designs). I used some denim yardage that I believe came from scraps of ultra-long curtain panels from IKEA that I had cut and hemmed for Wild Thing's room (now Teen Wonder's room) back in 2005. It's a nice weight for bags and I have lots left so I will be using it again soon.


The stitch colors and zipper tie together with this floral print lining made from a cotton in my stash.


I used some of the gathering technique from another tutorial from Noodlehead (Gathered Clutch) while trying to design a pouch with a gathered look. I really like the style and overall look of the pouch, especially the argyle contrasting fabric and the pink zipper and lining. And the gathered shape is exactly how I pictured it would come out. But I will make some changes and try this one again. There were too many layers at the top for installing a zipper well (at least for this advanced beginner). There are some minor puckers in the lining and uneven bits on the exterior.  But I think I can figure it out. I even might make a tutorial if it comes out well the next time. I need to learn how to make a proper tutorial. I also need a better camera. My birthday is coming up - so I'm researching (well, I will research next time I have insomnia) the Digital SLR options for entry level price point.


I'm not sure where these will make their homes yet. I've got some PIF (pay it forward) gifts to fulfil and there are always gift opportunities. And then there is just me who may decide to keep one of them!

I'm linking up with Sarah's Whoop Whoop Friday Linky party - please go take a look at the other links! That's where I'm headed next...

Monday, July 18, 2011

Christmas in July quilt - not sure how to move forward...

sad. I have had this quilt top and back done since early this year. Maybe even as early as January since I meant to make it for the holidays last year but never started it until after Christmas.  Now it's been sitting in a neatly folded pile with the batting on a bookcase in my crafty basement and I don't remember when I finished it at all.


The top is made from a Moda Layer Cake of the12 Days of Christmas line from Kate Spain. I think "Piece of Cake" is the name of the pattern (or something similar). I remember it came together very quickly and I do like the result very much.

The back is pieced using the panel from the Kate Spain line plus a couple of the prints (below). I think the final size will be something like 60 x60 inch, though I didn't measure it today - it may be a bit bigger than that. I will definitely post the whole thing once it's actually quilted and bound in the red print I have already cut into strips for the binding.


Well, I meant to have it quilted professionally, but the quilter I used last year for a couple of quilts had an injury when I called (February? March?) and I don't think she's taking new quilts anymore and now I have TWO quilts waiting (the flying geese one I showed pix of before too...).

Since I needed to finish the Hands 2 Help quilt, I decided to be brave and free motion quilt one myself that was larger than a baby size. Now I know I can do it, so I'm thinking I should just tackle these and get them done. But I have to figure out a quilt basting strategy. i.e. where do I find a space large enough to tape down a quilt back, or at least a table I can use?  AND do I try pinning this time or give spray basting another chance? ...and I also don't know how I want to quilt it yet. Straight lines? I don't know how I will like that if I don't manage to get the pieced back perfectly squared with the front, or with lines stitched through the panel panes on the back.  So the standby stippling?  Or maybe some more interesting free motion quilting pattern?  What color thread should I use? A nice off white? I was wondering about straight lines in a grid with randomly spaced lines in aqua blue but with a few green and red scattered in. Or maybe I will look for a variegated quilting thread for a free motion pattern - I don't have any on hand but it seems like it might be a good option.

(furrowed brow) Any opinions?

I actually have some other unfinished projects I should finish or work on, and my Pay It Forward projects to make and send out. So maybe I have a little time to consider this before I jump into it. I mean this one is a Christmas quilt and that is ages away (right?) But once I tackled the H2H quilt I had this feeling I should charge ahead with my other unfinished quilts. It went pretty quickly and I really love the FO feeling.

Sometimes I wish paying the mortgage wouldn't get in the way of my obsessive compulsive crafting habits!

Saturday, July 16, 2011

Finished the H2H Plus Quilt!

Yay!
I managed to finish this quilt before the deadline and I am so relieved. Plus, I really like how the Plus Quilt came out. It was a fun challenge to have the "blind date" fabric swap and then round out the prints I received with things from my stash.  It's funny too - I just squeaked in the basting and quilting over the holiday weekend before we left for vacation in Alaska. Then binding the quilt yesterday I had a new appreciation for the animal prints with moose and bear!


For the backing I used a solid blue Kona with a strip of scraps from the front across the middle.


This was my first time with spray basting - I had a hard time with it largely for the same reason I have trouble basting anything larger than a crib quilt. I don't really have a nice big space to tape down the backing. Anyway, I worked up quite a sweat smoothing out all the wrinkles and I was worried there would be some unsightly puckers. So I did a free quilting meander - only my second time, so it was good for practicing that skill anyway. But I'd imagined a straight line quilting pattern beforehand.  Anyway, I didn't have any puckers to speak of, and with the washing and drying all would have been forgiven by the end.  I do like this look a lot though, but I guess it isn't everyone's favorite.

Just a little more detail... and below the whole enchilada!


I used some of the green and yellow print scraps for binding. Another new skill attempt with mixed results - machine binding. hmmm. I would start with slightly wider strips next time (I used 2.5") so that more will fold over the back because I had to go back and re-stitch and couldn't really stitch in the ditch to catch the back of the binding. So I think the binding looks pretty sloppy, but I wanted to make sure it would hold up to some abuse once it reaches a child in Romania.  To be honest, this is the second time I did a machine binding, and I will probably go back to hand stitching the backside. Between all the pinning I did and the going back to restitch it didn't feel like any time savings was worth the sacrifice in aesthetics. Maybe if I learn to do this from someone who really knows how I will change my mind though.

Anyway, I hope I can link this up to Sarah's Whoop Whoop! for the week - but since it's Saturday and not Friday we'll see!  Go over there anyway to check out some more impressive posts from creative geniuses!

Sunday, July 3, 2011

Awesome surprise to get when you come home from a business trip!

Some time ago, I signed up for a "Pay it Forward"  chain where you sign up on someone's blog to get a surprise handmade something, and in return you agree to pay it forward to 3 more people.  I haven't made my PIF presents yet, and to be honest, I had completely forgotten about the fact that I would be getting something in the mail by surprise sometime this year.

I was out of town on business last week, and when I got home there was a padded envelope among my mail on the kitchen counter - with this wonderful patchwork tote bag inside! It is from Brita at Scraps of Happiness! and it is so bright and sunny. I used it all over town yesterday, the weather was glorious, and it carries a lot of stuff (always a good thing).


But wait, there's more!  It's reversible too!  Below you can see the inside, which can be the outside today if I want. 


I love the reversible idea and have seen some tote patterns I'd like to try, but this isn't a design I've seen before. It's an offset square patchwork so the shape is a square bucket. I feel really lucky - Thank you so much Brita!!    I'd better get to work on some handmade gifts for my recipients.  But we are leaving on Tuesday for Alaska - family vacation (yay). So it will have to wait a little longer...

Happy Independence Day to all of us here in the USA!