Showing posts with label photography. Show all posts

Sunday, March 25, 2012

My new camera bag - big Whoop!

I got a DLSR months and months ago - and it's been sitting on a shelf in the original box except when I use it. Which hasn't been enough because I didn't have a bag I could throw it in to take along with me.

But now I do.

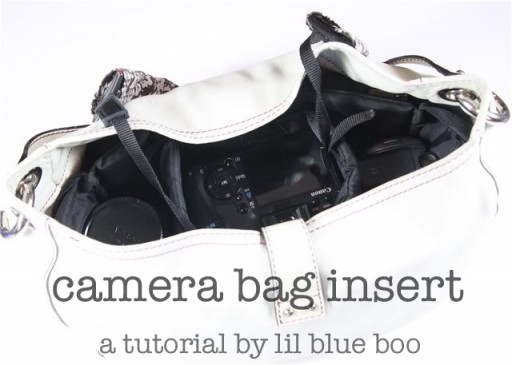
I got this idea from a tutorial I found online to turn a regular purse into a padded camera bag here on Lil Blue Boo.

So I kept my eyes open for a suitable purse on sale and found this one at Kohls a few weeks ago. I think I paid maybe $20? And it had an umbrella too (bonus!) - I like the bright yellow color.


You need a bag with an open inside (no dividers) and a squared (rectangular actually) bottom to fit an insert into and for stability.

I needed to modify the measurements in the tutorial, and didn't follow it to the letter, but it was pretty easy - and I had all the materials (besides the bag) already on hand:
 This denim repurposed from some IKEA curtains (I have a lot of this, so you've seen it before...and you'll probably see it again).  I also had cardboard, 1/2 inch foam, and spray adhesive on hand. I did buy some extra velcro but that was it.

I cut a bottom and four sides from both the cardboard and the foam.
Basically, if you've made a simple tote bag with a squared bottom, then you already know how to do much of this.  The only tricky part was that the math didn't seem to come out right for me first time I tried to change the measurements for the tutorial, so I used some empirical measuring to square the bottom on the second try.


After cutting 2 large rectangles of fabric to match your bag measurements, just stitch up the sides with right sides facing. 

Then square the corners - checking with the cardboard bottom piece to be sure the measurements look right.


Before sewing up the lining, add your velcro strips (I tried out the fusible ones and so far they seem sturdy).


The construction bits are not shown here - using the adhesive I found it was easier to stick the foam pieces to the corresponding cardboard and then insert the bottom first (with adhesive on the bottom of the cardboard too). Then I inserted the lining and fit the side foam panels in, tucking and futzing them around to be a snug fit.  The tutorial instructs a handsewn finish at the top - this may look nicer, but I was feeling too lazy to do that, so I folded and pinned, and then stitched on the machine - it was tricky with the cardboard and foam panels, but they are still flexible, so with care I managed it.


Then I made two inserts with only foam and with velcro on the end tabs to make 3 compartments in the bag that can be adjusted and moved as needed.

And Voila!  An attractive camera bag!

This bag won't suit every occasion - like it won't be particularly good for travel the way I do it, since I'd need a more multi-functional bag to carry other items too. But I can throw this in the trunk to take around with me, and I can fit my wallet and cell phone in there if I'm going to an event or something.

I would do some things differently if I make another one - there was a nice tutorial on Sew Mama Sew! awhile back that looked more flexible and very nice for example. But this bag makes me really happy for the moment. The inside and outside pockets are very handy for smaller things like memory cards and a lipstick. Handbag-like camera bags can be quite spendy, so making one for under $30 feels good.

It's already Sunday, but I was out of town on business all last week, so I'm linking up with Sara's Whoop Whoop! Linky party - it seems that the Master linky app was down due to technical issues and many link-ups seem to have been affected - so the party was extended!
It also looks like I missed the Hands2Help official signup too, but there's still time - I just need to figure out if I have the time this spring - it's another busy time! Go check out the Linky's and if you are a quilter, consider a charity quilt challenge - H2H or something else close to home.

Have a great week!

Tuesday, September 6, 2011

Three day weekend finish - the Baguette Clutch!

Did I mention how much I love my new camera?  I have hardly used it yet, but tonight I looked at the clutch I finished yesterday and thought to myself, "self! do you think your new camera can handle nighttime shots of a project without that yellow blurry look?"

Yes it can!


I don't have a lot of time, and I was pretty pleased with the on-board white balance adjustment and the manual exposure I got right off the card. But for that last shot I opened it in Photoshop Elements and just did a tiny bit of futzing around to see how I could start thinking about making the images even better. A little more contrast and such and the yellow on this Amy Butler print really pops out so much more.

Oh, the clutch itself was made from a kit that I ordered from u-handbag - the Baguette Clutch. Everything was included in the kit except thread and glue - and I bought the glue from Lisa's shop too.  If you don't know  u-handbag, the blog, and Lisa Lam, well you are missing out! I have referred to her tutorials several times and have been intending to use some of her tutorials, especially the For Pleats Sake handbag.  I also ordered her book "The Bag Making Bible" - but I haven't gotten it yet...

I saw a giveaway for one of these kits, but of course didn't win (wait, did I remember to enter? oh well...) Anyway, I've wanted to try a framed coin-purse sort of project, so I thought I'd order a kit from the guru to cut my teeth. The pattern and instructions were very clear, down to the waiting for the glue to dry awhile before sticking the bag to the frame ("make yourself a cuppa" while you wait!). I have one more kit - the easier looking one of course, and also another frame to try making my own pattern (Lisa has instructions somewhere on her blog how to do this too).

Go check it out!  The one and only drawback is the exchange rate to UK sterling, making it a little more expensive for US customers than maybe you could find for something similar on etsy. But I guarantee you won't find a better DIY kit/package and more freely shared knowledge on how to turn out a practically perfect bag first try anywhere else. That made it worth the exchange rate markup - every penny!

(another totally impractical evening bag? guess Mr. Wonderful better start cranking out some elegant date nights!)

Linked up over as Sew Much Ado:

Friday, September 2, 2011

My new toy!!

I got the most splendid birthday present and I am so excited! Years and years ago I used to take a lot of photos on film and I used a Pentax K1000, the VW Bug of film SLRs.  I loved that camera and it loved me. It traveled to different continents with me and in the jungle and savannas and cities afar. I have carousels of slides that I took with it and a couple of nice lenses.

Then I started using a point and shoot Elph with that new fancy cartridge film (what is that called?), and then moved to a couple of different digital cameras that have been okay. But I just don't take good photos with them for whatever reason.  And I think that having a slightly larger camera means I remember to take it with me (but we will test that theory now).

So, I've thought about a digital SLR for a little while now. I didn't know what to get - Canon or Nikon?  Well, there is a Pentax option that gets great reviews AND that I can use my old 50mm 1:2 lens with the K mount with. And other old Pentax lenses that may not be too expensive nowadays but would be fun to try (my dad apparently has a collection so I asked him to go through and see if there was anything interesting. I'm pretty sure he has a nice wide angle lens...)

I asked for the Pentax K-r for my birthday - and now I have one!  And I've learned that I have forgotten most of what I once knew about taking photos (which wasn't a huge amount to begin with), and digital introduces new concepts. But I have been playing a little with it, just around the house so far...I'm trying the manual mode rather than preset auto modes (of which there are several).

Cody in a semi-dark bedroom

close shot of my birthday bouquet
this is the same shot, cropped to show more detail...
And even more cropping - the image maintains nice detail even sized for the web at 60% quality.
a new shot at my little corded handbag...compared with the original shot below (which I took with a point and shoot Lumix) The first one was doctored up a bit in Photoshop Elements to get the colors right. I didn't do any editing at all with any of these photos. I used the white adjustment right on the camera before shooting.


A couple of different versions of the same shot of our front door from the couch - it will be fun to play with the composition of photos with different settings.

So much fun!!  Thank you to Mr. Wonderful, Teen Wonder, and Wild Thing!! I just asked for one present this year so they all pitched in (especially Mr. Wonderful). xoxoxoxo

I need a camera case for my new baby - if anyone knows of a great pattern for making one please let me know. I'm thinking I could adapt a diaper bag or box pouch pattern or combine elements somehow...

(linked to Sarah's Whoop Whoop! because I actually did get a new post in on a Friday)