Sunday, August 28, 2011

End of summer finishes - just a little to share

What the heck? It's been ages since I've posted. We went to the Lair for a week and got thoroughly sunburned, rested, hiked, swimmed, cocktail partied (camp style), campfired, sang, boated, visited, and generally had a great time. As usual - it was our 5th year at the Lair and the magic still burns for the whole family.

We're rebuilding our garage - a somewhat slow but steady project this summer. "We" includes a contractor who has done most of the work. But we spent much of this weekend painting primer on all the new walls and interior ceiling.

School is starting tomorrow for Teen Wonder and Wild Thing. And I'm just the kind of mom who braves the craziness of OfficeMax and Kohl's and Old Navy just the day before school starts. Because it just always seems to work out that way. What up? I was never an all-nighter kind of college student, I hate being late...but for some reason it never hits me until the last minute that summer is ENDING. TOMORROW. yikes.

And in concert with all this, my crafty refuge in the basement is occupied by bicycles, sleeping bags and packing boxes, and piles of torn jeans and T-shirts for memory quilts all dumped on my sewing table by my loving children. I should be damned proud I have anything at all to post on this blog, dammit!

So, #1 Finished Object for your viewing pleasure - a project that was officially a knitting project on my list, but which turned into a sewing project - the "Corded" inspired handbag:


It's made from Noro Daria yarn that I found a couple of years ago in a sale bin. My mom asked me "what do you make with a yarn like this?"  Fair question, as it is more like a string or cord than yarn. I guess the only other thing I would think to make is a belt - but the colors say bag, not belt, to me.  Anyway, there is a free pattern for a small clutch called "Corded"  by Grumperina. The pattern uses 1 hank and I had 2, so I thought I'd make something a little bigger. Heh. That was probably my first mistake.

This handbag looked like a limp biscuit when I finished knitting it.


So I knew I'd need to at least line the thing.  But I decided to construct a separate lined zipper bag and a flap lining and sew them in.  The bag shows through the knitted fabric, so I figured a simple lining would not suffice. And I wanted more stiffness, so I interfaced both lining and bag pieces of dupioni silk.  Stitching them into the knitted bag was the trickiest part. In fact, I need to undo and re-do the bag stitching part because my knit and fabric bodies didn't line up all the time and the stitches didn't hold on the front top edge. Poor sewing quality - shape up!


Although the zipper bag has good body and holds quite a bit, this is a highly impractical bag for me personally due to the loose knit fabric and the stitching holding it all together.  I generally need something more durable because I'm not girly enough for dainty items and forget to be careful with things that I'm carrying around or wearing. But I took it to a party last night and got compliments immediately, so maybe it's worth it.  I do love my little button detail and the strap I managed to squeak out of my scrap of Daria that I had leftover (just a crochet chain stitch cord). So officially, a success story - all stash materials and at least one successful public appearance.


Next FO is another attempt at the zippered bag I made before with denim but wasn't entirely happy with - this time I used a dupioni silk for the body and a different cotton print and lining. But I attached the contrasting top band after installing the zipper this time to reduce the bulk at the zipper seams. I like this much more.


I want to make at least one more, so I'm thinking of a tutorial. Like a real live tutorial with better photos and maybe a .pdf. The bag was constructed combining elements from the "Gathered Clutch" and "scrappy make-up pouch" tutorial both from Ana at Noodlehead. I love her tutorials so much and have used these free tutorials several times now, so I am feeling that I want to buy a couple of her bag patterns now - the 241 and the brand new "Go Anywhere Bag".  I will be sure an blog about them when I do. There are so many free bag patterns out there, and several in craft books and magazines that I already have, but I learn so much from these tutorials that it seems like a win-win to actually pay her for some patterns!

Anyway, here are the materials I have set aside for another of these gathered pouches.  When I can come up for air one of these days, hopefully with a new camera that I begged asked for as a birthday gift this week, I will attempt an actual tutorial for this little bag. Meantime, I have enough little projects to send off for my PIF projects, so I need to get on top of mailing those out.


 Happy first day of school (to us)!! - I hope you are all safe on the east coast, my friends, and wish all of you a great week!

9/2 edited to add to Whoop Whoop Friday at Confessions of a Fabric Addict. Because I never have a post ready in time for Friday...I thought I'd link up a few days late!


8/31" edited to add the Link-up party at Tea Rose Home - go check it out! oh and happy birthday to me!


Friday, August 12, 2011

Giveaway winner courtesy of Mr. Random Number Generator

Figuring out blogging little by little...since this is my first giveaway I had to figure out how to add comment numbering to my blog last week. This week I looked up Random.org and added a widget (gadget) to generate random integers (see sidebar). You can go to Random.org and generate a random integer anytime right there too, without the widget.

Anyway, I had 21 comments, and Mr. Random Number Generator over there chose


comment 3 

Beth Hoch said...

Hey Janet! Happy Anniversary!
I am a long time crafter, first time commenter ... Has been a very full summer. Looking at colleges for Emma ... (You are probably doing the same thing) ... Ada broke her ankle. Waiting for more sun! Thanks for sharing all your fun ideas .
------------------------------------
Hey Beth, congratulations!  I remember some of your crafty goodness from what seems like so long ago now! Hard to believe that our girls are Seniors this year - yikes! Walking to Kindergarten at Edison with you guys doesn't feel that long ago somehow.  Anyway, I will be emailing you, and you can let me know where to drop the goods!


Thanks so much to everyone for entering, and now that I have the ability to run a giveaway I will have to come up with more excuses in the future!


As for any actual updates this week, well I haven't had time for crafting much for the past couple of weeks - off-site meetings, busy summer craziness, and Nana visiting (aka my wonderful mom) have taken a higher priority. And now we are packing and off to the Lair! for our annual family camp experience. What is the Lair! you ask? It's summer camp for the whole family, complete with platform tents, campfires, singing songs, swimming pool, hikes around the lake, party boat cruising, star-gazing, horseshoes, softball, scrabble...and don't forget the cocktail parties and the occasional mid-afternoon nap. nice.  It's in the Sierras and run by the Cal Alumni association, and it is something our whole family gets excited about every year. This will be our fifth summer going.


Saturday, August 6, 2011

First blogaversary + first giveaway!

--Giveaway closed!--

It's my blog-a-versary!! (blogiversary?)...anyway, I'm having my first giveaway to celebrate. Last year I started this blog as an experiment. I'd started checking out other blogs long ago, most often when I was looking for a technique or tutorial - except for a few knitting or general sewing/craft blogs I'd followed more diligently.

It has been a fun year of testing this out. I've posted only 67 times, but I wanted to post at least once a week, so I more or less averaged out to that.  I have posted many crafty projects, large and small - and I have a really nice small group of cool followers, both through Google/blogger and through Facebook. I entered contests (with some success), giveaways (random success a few times), a charity quilt project (H2H just finished), and even submitted a block design to Fat Quarterly - all things I would not have done if I hadn't been blogging. Even as a part-time crafter this is a really great feeling to have after one year.

So for any of you who would like a little giveaway - here's your chance!  I'm sure it won't be my last because I have now won 4 giveaways at least, myself (recently a couple of charm packs from lovely blogland shops). So I need to keep the kharma flowing.

Here is what I am offering (please note that if you are strictly a knitter and not a sewist or quilter I could be persuaded to swap the fabric for some yarn from my stash...)

First this little stack of 4 Michael Miller FQs - from some fabrics I bough recently and though it would be fun to share. I think they are just so pretty and remind me of a summer garden. 


And second is a little zipper pouch made from a cute Japanese owl print and a gold stripe lining - 


The pouch and fabric make a cute little bundle tied in twine and they will be sent out to a lucky winner in honor of my happy 1st blogaversary (blogiversary?). (Remember, if fabric is not your thing - even if fiber in general is not your thing I am sure I have something in my crafty stash to send out...so please celebrate with me!)

To enter, just leave me a comment below. Tell me anything you want about your summer so far - has it been good? crazy? international? campy? homey? hopefully not too natural disaster-y...

If you are one of my faithful followers (or if you want to become one), you can leave an extra comment telling me so for an extra entry.

Mr. Random Number Generator will choose a winner on Thursday 8pm PST.  PLEASE leave an email address in your comment if you are not a blogger or on google connect with an email reply option - "No Reply" comments are impossible to notify if they win! You can be tricksy and just write the at's and dot's out to avoid spammer-spies or whoever may want access to your email through viral invasion type means...

Yay!

Saturday, July 30, 2011

Fat Quarterly Issue 6 is here - check out my Churn dash Designer Challenge contribution!


Do you know about Fat Quarterly?  I'm guessing if you are reading this post that there is at least a 50-50 chance you do.  It is a fantastic online quilting magazine that I discovered in the past year here since I've been active in blogland and I bought all the back issues and a subscription.  I've enjoyed every issue and made a few of the projects (and have several more queued up)!

Quite a while back, I submitted a project to the Fat Quarterly Reader Challenge - the Circular Logic Pillow. And I won the small project category (!!) which still blows me away. I do love that pillow.  The pillow was shown in Issue 5 of FQ. I was honored and thrilled to say the least.

Anyway, shortly after that the editors asked if I'd be willing to participate in the Issue 6 Designer Challenge feature - this is a feature where a traditional block or other theme is assigned and then several quilters or sewists put together an interpretation of their own.  My submission was for the "Churndash" quilt block theme...and it's available now!

I know right? "Designer"?  Me? not exactly. But it was really fun and I actually do enjoy sketching out quilt blocks and quilts with my colored pencils (or in ink in the back of my notebooks at work during particularly long drawn out tele-conferences)

Here is a basic churn dash block diagram:


And here is my interpretation:


There is a pretty long explanation in the FQ Issue 6 explaining my thought process, but essentially I wanted to replace the HST corner units with quart circle units. Oriented like this, you can generate circles at the intersections of the blocks.  Below you can see how this looks with just 4 blocks. I haven't had a chance to build a whole quilt top yet, but I think I'll like it.  I already want to make a 2nd variation though that I'll call "Drunkards Churndash" because I think corner blocks that have more of the center portion print would look really interesting - but it would be a pretty different look.  When (if) I do, perhaps I can add a tutorial for the block and even possibly a whole quilt pattern (a first timer's version of one anyway).


The editors at FQ took the basic instructions I sent for these blocks and formatted them to be a pretty intelligible tutorial if you are really keen to see it in the meantime. Please go support Fat Quarterly and buy Issue 6 - there are so many great patterns using different fabrics than only quilting cottons (even a paper quilt that I love).   You can preview the issue first on the website if you aren't convinced.


cool.

Friday, July 29, 2011

Friday finishes (or "I owe it all to my insomnia...")

I had a real problem sleeping this week. Actually ever since I got home from New Jersey last Friday. I even tried drugs (Ambien) after watching TV, reading, playing mindless games on my iPod, and just lying there in bed thinking I should go to sleep. So a couple of nights ago I went to my crafty corner, cleaned up a bit and then dragged out all kinds of fabric into a big mess again to figure out something to make.

I have 2 zippered pouches to show for it now. Both just made up more or less based on some skills I built following tutorials. My favorite pouch tutorial is this one from Noodlehead.

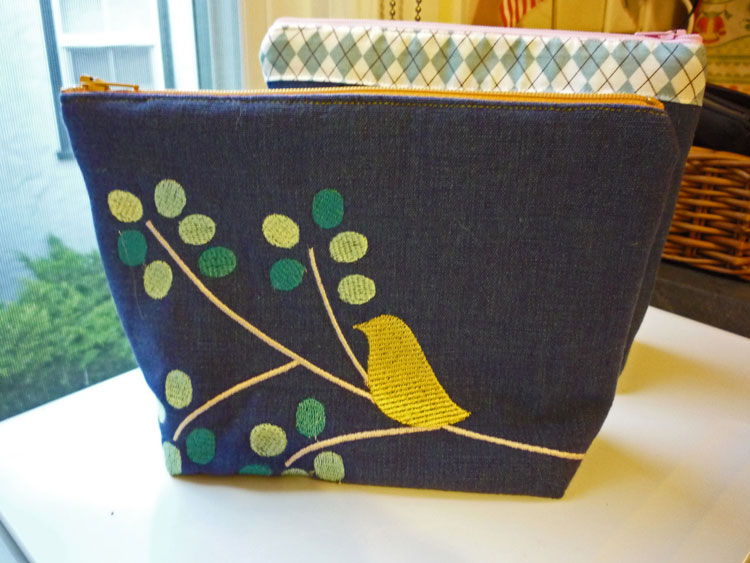
For this first one, I used the dimensions and instructions for that pouch in the tutorial, but instead of patchwork, I stitched out this little bird on a branch embroidery (from Meringue Designs). I used some denim yardage that I believe came from scraps of ultra-long curtain panels from IKEA that I had cut and hemmed for Wild Thing's room (now Teen Wonder's room) back in 2005. It's a nice weight for bags and I have lots left so I will be using it again soon.


The stitch colors and zipper tie together with this floral print lining made from a cotton in my stash.


I used some of the gathering technique from another tutorial from Noodlehead (Gathered Clutch) while trying to design a pouch with a gathered look. I really like the style and overall look of the pouch, especially the argyle contrasting fabric and the pink zipper and lining. And the gathered shape is exactly how I pictured it would come out. But I will make some changes and try this one again. There were too many layers at the top for installing a zipper well (at least for this advanced beginner). There are some minor puckers in the lining and uneven bits on the exterior.  But I think I can figure it out. I even might make a tutorial if it comes out well the next time. I need to learn how to make a proper tutorial. I also need a better camera. My birthday is coming up - so I'm researching (well, I will research next time I have insomnia) the Digital SLR options for entry level price point.


I'm not sure where these will make their homes yet. I've got some PIF (pay it forward) gifts to fulfil and there are always gift opportunities. And then there is just me who may decide to keep one of them!

I'm linking up with Sarah's Whoop Whoop Friday Linky party - please go take a look at the other links! That's where I'm headed next...

Monday, July 18, 2011

Christmas in July quilt - not sure how to move forward...

sad. I have had this quilt top and back done since early this year. Maybe even as early as January since I meant to make it for the holidays last year but never started it until after Christmas.  Now it's been sitting in a neatly folded pile with the batting on a bookcase in my crafty basement and I don't remember when I finished it at all.


The top is made from a Moda Layer Cake of the12 Days of Christmas line from Kate Spain. I think "Piece of Cake" is the name of the pattern (or something similar). I remember it came together very quickly and I do like the result very much.

The back is pieced using the panel from the Kate Spain line plus a couple of the prints (below). I think the final size will be something like 60 x60 inch, though I didn't measure it today - it may be a bit bigger than that. I will definitely post the whole thing once it's actually quilted and bound in the red print I have already cut into strips for the binding.


Well, I meant to have it quilted professionally, but the quilter I used last year for a couple of quilts had an injury when I called (February? March?) and I don't think she's taking new quilts anymore and now I have TWO quilts waiting (the flying geese one I showed pix of before too...).

Since I needed to finish the Hands 2 Help quilt, I decided to be brave and free motion quilt one myself that was larger than a baby size. Now I know I can do it, so I'm thinking I should just tackle these and get them done. But I have to figure out a quilt basting strategy. i.e. where do I find a space large enough to tape down a quilt back, or at least a table I can use?  AND do I try pinning this time or give spray basting another chance? ...and I also don't know how I want to quilt it yet. Straight lines? I don't know how I will like that if I don't manage to get the pieced back perfectly squared with the front, or with lines stitched through the panel panes on the back.  So the standby stippling?  Or maybe some more interesting free motion quilting pattern?  What color thread should I use? A nice off white? I was wondering about straight lines in a grid with randomly spaced lines in aqua blue but with a few green and red scattered in. Or maybe I will look for a variegated quilting thread for a free motion pattern - I don't have any on hand but it seems like it might be a good option.

(furrowed brow) Any opinions?

I actually have some other unfinished projects I should finish or work on, and my Pay It Forward projects to make and send out. So maybe I have a little time to consider this before I jump into it. I mean this one is a Christmas quilt and that is ages away (right?) But once I tackled the H2H quilt I had this feeling I should charge ahead with my other unfinished quilts. It went pretty quickly and I really love the FO feeling.

Sometimes I wish paying the mortgage wouldn't get in the way of my obsessive compulsive crafting habits!

Saturday, July 16, 2011

Finished the H2H Plus Quilt!

Yay!
I managed to finish this quilt before the deadline and I am so relieved. Plus, I really like how the Plus Quilt came out. It was a fun challenge to have the "blind date" fabric swap and then round out the prints I received with things from my stash.  It's funny too - I just squeaked in the basting and quilting over the holiday weekend before we left for vacation in Alaska. Then binding the quilt yesterday I had a new appreciation for the animal prints with moose and bear!


For the backing I used a solid blue Kona with a strip of scraps from the front across the middle.


This was my first time with spray basting - I had a hard time with it largely for the same reason I have trouble basting anything larger than a crib quilt. I don't really have a nice big space to tape down the backing. Anyway, I worked up quite a sweat smoothing out all the wrinkles and I was worried there would be some unsightly puckers. So I did a free quilting meander - only my second time, so it was good for practicing that skill anyway. But I'd imagined a straight line quilting pattern beforehand.  Anyway, I didn't have any puckers to speak of, and with the washing and drying all would have been forgiven by the end.  I do like this look a lot though, but I guess it isn't everyone's favorite.

Just a little more detail... and below the whole enchilada!


I used some of the green and yellow print scraps for binding. Another new skill attempt with mixed results - machine binding. hmmm. I would start with slightly wider strips next time (I used 2.5") so that more will fold over the back because I had to go back and re-stitch and couldn't really stitch in the ditch to catch the back of the binding. So I think the binding looks pretty sloppy, but I wanted to make sure it would hold up to some abuse once it reaches a child in Romania.  To be honest, this is the second time I did a machine binding, and I will probably go back to hand stitching the backside. Between all the pinning I did and the going back to restitch it didn't feel like any time savings was worth the sacrifice in aesthetics. Maybe if I learn to do this from someone who really knows how I will change my mind though.

Anyway, I hope I can link this up to Sarah's Whoop Whoop! for the week - but since it's Saturday and not Friday we'll see!  Go over there anyway to check out some more impressive posts from creative geniuses!