Showing posts with label bag. Show all posts

Friday, December 7, 2012

some sewing: electronics cases for Teen Wonder and me

Since I haven't been posting regularly, I actually have a little backlog of little projects that I want to share. First up today? My iPad cover. I got an iPad for my birthday, and of course needed something to protect it when I carry it around - just a simple little envelope cover with this cute Japanese doll fabric and lined with flannel. 


Around the same time (well, two weeks later), Teen Wonder got a Kindle Fire for her birthday - so of course I'd already figured out how to make a nice cover for a tablet and just needed to go down in size a bit.  I also made a little zippy pouch for her to carry her charging cord. I should make one of those for my iPad too!
Below is what is on my sewing table at the moment - so far, it's a jelly roll race with mostly Kaffe Fassett strips. I have a plan for the entire quiilt as a large bed size, but this is as far as I've gotten so far:


Linking up to Sara's party...

And also to TGIFF at Quokka


And if you are reading this, maybe you'll go over to the Vintaj Design Challenge and vote for my pendant - it's #6! You can also see the details in my previous post

Friday, July 13, 2012

Last minute Whoopursepalooza!

Last minute entry to the Purse Palooza! (button on your right!)

I made a cute little framed clutch using U-Handbag's Fortune Cookie pattern (and frame).
cookie clutch closed
The fabric is matching the piece I used for my messenger bag makeover posted last week.  It's from the Laura Gunn Lantern Bloom collection. I love this fabric!  The lining is a bit of Denyse Schmidt to coordinate.
cookie clutch open

I didn't enter the messenger bag in the Purse Palooza because strictly speaking, I did not make the bag - I just gave it a lovely facelift. But I will say that the Palooza inspired me to make some bags in the past couple of months, so even though winning a contest is always a longshot with so many talented people out there - this event was quite effective!

cookie clutch with messenger

I will also link up with the fabulous Friday linky parties, as usual:
Whoop! Whoop! with Sarah 
And TGIFF over at Quilt Matters

Show-off Friday with Elizabeth at Pieceful life

Thursday, July 5, 2012

15 minute messenger conference bag hack (upcycle)

Every time I go to a scientific or medical conference, there is a "conference bag" included that holds the program, abstract book, sometimes a special publication, and a bunch of industry symposium flyers telling you when the competition special sponsors will be telling you what's the latest.

I have gotten so many of these, that I've donated several, or even left them behind in the hotel room if they are particularly poorly made or too big to take home (like wheelie backpacks from China, for example). Once in a rare while I will save one to use, usually as a beach bag or something where I don't mind it getting ruined.  This past April, at the European liver congress ("EASL"), we got pretty decent canvas messenger bags. Sponsored by Roche and all Fair Trade and organic and stuff (hey, good job employer - it's nice to be proud of your conference bag!).

(Before)
I immediately thought "hey, I should just hack this to somehow not look like a conference bag anymore 'cuz it's actually pretty decent and a good size with a good length strap for cross-body carriage". Wel yl, last weekend we went to the Alameda County Fair, and I wanted a bag with a long strap for the day. Why couldn't I use one I already had? Well, that takes away my excuse for spending an extra 15 minutes (okay, it may have been a little longer) to transform this bag.
Inside is simple with a single side pocket, but all completely finished with a full lining (not the norm for most conference bags).  The strap is a little scratchy and did shed a little on my black jacket at the conference. I might make a cover for it later, but not within this15 minute window of time.

Like any project, gathering up materials takes longer than you plan for. But it didn't take me long to locate this  piece of fabric in my stash - just a FQ or so size scrap. I also found some brown bias tape in the huge stash of trims and tape that my mom recently brought me - my grandmother's old stash (I need to make a post just about that soon).  I used Heat&Bond to fuse it to the outside cover of the bag by 1) cutting a piece of each to fit the front of the bag with about 1/2" extra at the top edge. I fused the interfacing to the fabric, trimmed it a bit to fit, and then pressed the 1/2" under to give a clean edge where I wouldn't be able to attach binding tape.  Gotta love Heat&Bond! I haven't used it much before, but I just peeled off the paper and pressed the fabric onto the bag - easy peasy!


After fusing the fabric on, I just stitched the binding tape onto the bag, and then stitched across the top to secure the edge of the fabric. I just folded the ends of the tape under on each side before stitching so I wouldn't have any raw edges.  And Presto!
(After)

I love me some instant gratification - don't you? And not only do I have a new messenger bag that I love, but I saved something from being tossed out.

I hope everyone is having a great weekend! I'm actually in Pacific Grove (Monterey) for a few days with the kiddos - Mr. Wonderful's birthday present this year is a little time without us to do whatever guy stuff he never gets around to when he's busy being a family man. We kinda miss him though.  But the fog is getting lighter so it must be time for us to go to the beach!

Linking up with Whoop! Whoop! at Sarah's


and TGIFF at Quokka Quilts (I can't get the button to work properly today, oops!)


Sunday, June 17, 2012

The J Bag - a beloved sweater re-purpose project

Edited on Friday June 22nd with a J. sweater "before" picture! How fun is that?  And since it's now Friday and I'm under the weather I'm going to some linky parties at the end of the post too!

Last weekend I finished this bag. It's been crazy around here, and I actually became obsessed with finishing it I think because I had so much stress about Teen Wonder's graduation and party plus all the end of year activities with Wild Thing's school, baseball team, etc. But also it had to be really awesome because this isn't just any bag. This was a sweater re-purposed. And not just any sweater - but a sweater made by a good friend. A sweater made with love and numerous hours and lovely Icelandic wool yarn. My college room-mate J. made this sweater for me back in the mid-80s. I thought I took a "before" photo of it, but haven't located it yet. If I do I'll amend the post to include it.  But I'll tell you it was big and roomy (and I'm not small!), with a shawl collar, and it was covered in bobbles (those things are not easy either - well, at least they are way time consuming to knit).
The J. Sweater before - the lighting is a bit green because the photo was taken in our basement right under the fluorescent lights. But you can see the amazing work it took to knit this up!
The thing is, after I moved to California in Fall, 1988, I probably could count on one hand the number of occasions that I could wear this sweater. My sensitive skin meant that I had to wear a full turtleneck underneath, and did I mention it was nice Icelandic wool?  I think I took it to the mountains a few times and played in the snow fully warm and protected from snowballs in this sweater.  But I rarely traveled with it even when I went places I could use it because it was pretty bulky to pack.  But no way could I get rid of such a special gift!

After I learned to knit in 2004 and also learned about felting, I wondered if there would be some way to convert all the lovely knit fabric of the sweater into something else. I made a couple of felted purses, and liked how the knit fabric transforms to a strong bag worthy material. But I didn't have the nerve to suggest this to J. until I had some clear idea how it might look like.  Anyway, this bag design emerged after felting the sweater and spending a few months looking at it and trying to imagine how it would look in various forms before I would even make a single cut. And now this is the end result:


I cut the sleeves off first, and then opted to flip the sweater upside down and make the ribbed bottom band of the sweater the upper edge of the bag. I ended up cutting the sweater at the arm pits, and I snipped out the collar to use for the purse flap.  I did a modest box shape at the bottom corners of the bag to give it some shape.


The handles and lining were constructed using some ultra-suede leftover from my dining room re-upholstery project back here. I will say that I probably wouldn't opt to do this again even though I love the look. I just don't have an industrial strength machine, so multiple layers of ultra-suede and felted wool were extremely hard on my machine. And my fingers!
Inside there is a full zipper divider pocket, so the bag can be more or less a zippered bag with my wallet and any other valuables. I added a smaller patch pocket inside with a pen slot and space for notebook and cell phone. 


I love the look of the hardware details on the handles, and there is a magnetic snap in the flap.  The flap looked nice alone - the angle at the bottom of the ribbed flap is a nice detail. But still a little unadorned, so I made a little fabric flower to finish off the look.


I hope J. will approve - there are a lot of mistakes that I learned from, but none that diminish the end result significantly.  It's a good size for a laptop or folio and books. It's less suitable to a number of fat lumpy things just because the depth of the bottom is not very large. It's also seasonable most of the year here in the Bay Area.

And there is still some bobbly felt that I may be able to use in a second smaller bag or something!

I am entering this bag into the Purse Palooza over at Sew Sweetness . If you are a fan of hand-crafted purses and bags, check it out!


Friday Linky parties!
 at Pretty Bobbins this week


Sunday, March 25, 2012

My new camera bag - big Whoop!

I got a DLSR months and months ago - and it's been sitting on a shelf in the original box except when I use it. Which hasn't been enough because I didn't have a bag I could throw it in to take along with me.

But now I do.

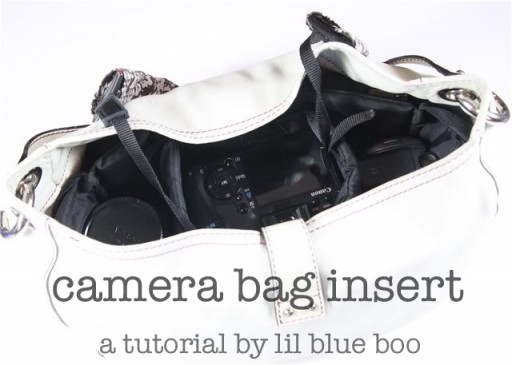
I got this idea from a tutorial I found online to turn a regular purse into a padded camera bag here on Lil Blue Boo.

So I kept my eyes open for a suitable purse on sale and found this one at Kohls a few weeks ago. I think I paid maybe $20? And it had an umbrella too (bonus!) - I like the bright yellow color.


You need a bag with an open inside (no dividers) and a squared (rectangular actually) bottom to fit an insert into and for stability.

I needed to modify the measurements in the tutorial, and didn't follow it to the letter, but it was pretty easy - and I had all the materials (besides the bag) already on hand:
 This denim repurposed from some IKEA curtains (I have a lot of this, so you've seen it before...and you'll probably see it again).  I also had cardboard, 1/2 inch foam, and spray adhesive on hand. I did buy some extra velcro but that was it.

I cut a bottom and four sides from both the cardboard and the foam.
Basically, if you've made a simple tote bag with a squared bottom, then you already know how to do much of this.  The only tricky part was that the math didn't seem to come out right for me first time I tried to change the measurements for the tutorial, so I used some empirical measuring to square the bottom on the second try.


After cutting 2 large rectangles of fabric to match your bag measurements, just stitch up the sides with right sides facing. 

Then square the corners - checking with the cardboard bottom piece to be sure the measurements look right.


Before sewing up the lining, add your velcro strips (I tried out the fusible ones and so far they seem sturdy).


The construction bits are not shown here - using the adhesive I found it was easier to stick the foam pieces to the corresponding cardboard and then insert the bottom first (with adhesive on the bottom of the cardboard too). Then I inserted the lining and fit the side foam panels in, tucking and futzing them around to be a snug fit.  The tutorial instructs a handsewn finish at the top - this may look nicer, but I was feeling too lazy to do that, so I folded and pinned, and then stitched on the machine - it was tricky with the cardboard and foam panels, but they are still flexible, so with care I managed it.


Then I made two inserts with only foam and with velcro on the end tabs to make 3 compartments in the bag that can be adjusted and moved as needed.

And Voila!  An attractive camera bag!

This bag won't suit every occasion - like it won't be particularly good for travel the way I do it, since I'd need a more multi-functional bag to carry other items too. But I can throw this in the trunk to take around with me, and I can fit my wallet and cell phone in there if I'm going to an event or something.

I would do some things differently if I make another one - there was a nice tutorial on Sew Mama Sew! awhile back that looked more flexible and very nice for example. But this bag makes me really happy for the moment. The inside and outside pockets are very handy for smaller things like memory cards and a lipstick. Handbag-like camera bags can be quite spendy, so making one for under $30 feels good.

It's already Sunday, but I was out of town on business all last week, so I'm linking up with Sara's Whoop Whoop! Linky party - it seems that the Master linky app was down due to technical issues and many link-ups seem to have been affected - so the party was extended!
It also looks like I missed the Hands2Help official signup too, but there's still time - I just need to figure out if I have the time this spring - it's another busy time! Go check out the Linky's and if you are a quilter, consider a charity quilt challenge - H2H or something else close to home.

Have a great week!

Friday, November 25, 2011

A Fall bag all my own to Celebrate Color!


A few weeks ago, I thought to myself "self - you should pick a couple of fabrics from your stash and try out that free bag pattern you saw awhile back. The one that's reversible, just 2 pieces kinda dumbell shaped to make the bag and handle all at the same time." The construction intrigued me - so simple, but I couldn't quite picture it until I tried it out.


Well...that simple thought turned into a much bigger process of making a bag that I would actually use myself as a handbag. But first I started with some recycled denim curtains and a bright Valori Wells deco weight cut from my stash as the lining - oranges of course.   What speaks Fall color more than denim and orange with some brown ultrasuede thrown in for good measure (the ultrasuede has a separate story as you'll see).

I used a basic pattern as the springboard that I printed off of All People Quilt (can't seem to find it on their website anymore!)

Then fused some interfacing to the denim and did a little scribble embroidery to echo the orange print.  I chose several vintage buttons to sew onto this weedy flower (my favorite kind of flower!) - most of which came from my grandmother's stash (of which I procured a fraction after her passing a year ago).


My favorite button from her stash on this bag is on the back by my signature - I remember her collecting owls when I was little. Then it was roadrunners...after that who knows. But the 70s Owl collection is still my favorite memory of those little vignettes. And I have proof of the owl collection right there! Because other than stashing fabric (which she did with a hoarders obsessive way), Grandma tended to get rid of stuff rather unceremoniously at random - or at least that's how it felt to a youngster.


Anyway, I added a pocket and a U-ring tab just in case it would ever come in handy to the lining.


And all would have come together peachy except I messed up the final construction steps, boxed my corners on the wrong sides, and had to do a fair amount of ripping back and adding a bit onto the bottom to fix it.  That was where the ultrasuede hit me - not only to extend where I'd cut and messed up, but it would add a nice bottom to the bag. I like it!

Last problem that had to be solved - I didn't like the way the bag gaped open unless it was tucked neatly under my arm (like only happens about 12% of the time). I couldn't find two halves of a sew-in snap in my stash, and so I surgically inserted a magnetic clasp. I would not recommend this method - for a variety of reasons - not the least of which is that the heavier side could probably use more reinforcement behind the prong attachment. But so far so good.

It's fun to pull off a pattern or concept without a hitch - but it is true that you learn more from making mistakes while constructing projects.  And this one was customized every hitch of the way to make it more fun (in my opinion) - and somehow doesn't distract from the overall workmanship impression anyway.  It's a solid bag, and fun to carry!

So, I'm slipping this in last minute to Celebrate Color! for November over at Stitched in Color!


Celebrate Color


Tuesday, September 6, 2011

Three day weekend finish - the Baguette Clutch!

Did I mention how much I love my new camera?  I have hardly used it yet, but tonight I looked at the clutch I finished yesterday and thought to myself, "self! do you think your new camera can handle nighttime shots of a project without that yellow blurry look?"

Yes it can!


I don't have a lot of time, and I was pretty pleased with the on-board white balance adjustment and the manual exposure I got right off the card. But for that last shot I opened it in Photoshop Elements and just did a tiny bit of futzing around to see how I could start thinking about making the images even better. A little more contrast and such and the yellow on this Amy Butler print really pops out so much more.

Oh, the clutch itself was made from a kit that I ordered from u-handbag - the Baguette Clutch. Everything was included in the kit except thread and glue - and I bought the glue from Lisa's shop too.  If you don't know  u-handbag, the blog, and Lisa Lam, well you are missing out! I have referred to her tutorials several times and have been intending to use some of her tutorials, especially the For Pleats Sake handbag.  I also ordered her book "The Bag Making Bible" - but I haven't gotten it yet...

I saw a giveaway for one of these kits, but of course didn't win (wait, did I remember to enter? oh well...) Anyway, I've wanted to try a framed coin-purse sort of project, so I thought I'd order a kit from the guru to cut my teeth. The pattern and instructions were very clear, down to the waiting for the glue to dry awhile before sticking the bag to the frame ("make yourself a cuppa" while you wait!). I have one more kit - the easier looking one of course, and also another frame to try making my own pattern (Lisa has instructions somewhere on her blog how to do this too).

Go check it out!  The one and only drawback is the exchange rate to UK sterling, making it a little more expensive for US customers than maybe you could find for something similar on etsy. But I guarantee you won't find a better DIY kit/package and more freely shared knowledge on how to turn out a practically perfect bag first try anywhere else. That made it worth the exchange rate markup - every penny!

(another totally impractical evening bag? guess Mr. Wonderful better start cranking out some elegant date nights!)

Linked up over as Sew Much Ado: