Friday, June 29, 2012

Class of 2012 - party on with DIY cupcake stand and more!

It's actually been 2 weeks since Teen Wonder graduated - yay!  It has been a bit of a crazy month all in all, since end of school year always involves a lot of extra kid-ventures and parties. I didn't take enough pictures of any of it...but that's usually because I'm living in the moment, right?  That's a good thing.

Anyway, we threw her a graduation open house party the day after graduation and invited all manner of family and friends - anyone who played a big role in Teen Wonder's life. After a lot of preparation, and an unnecessary amount of anxiety on my part, and help from my mom and Mr. Wonderful, it all turned out quite fabulous!  So, I just wanted to share some of the DIY bits that I put into the party...

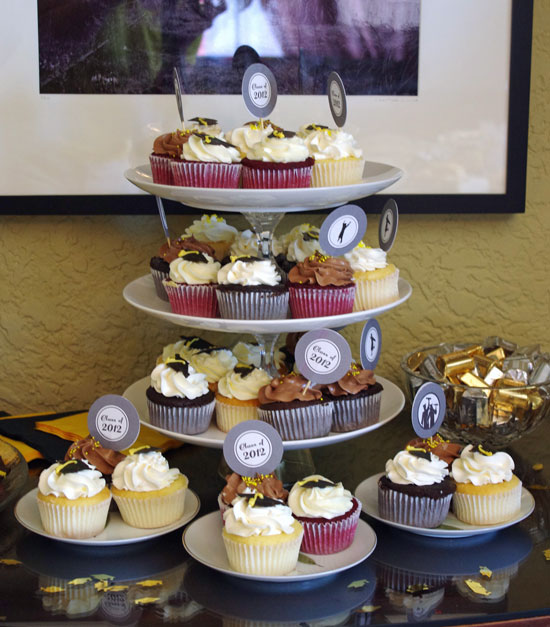
First up? A cupcake stand. I decided early on to have cupcakes rather than a big cake because for an open house that made more sense. I found a great place that made and delivered the cupcakes, but I realized after ordering them that I didn't have a cupcake stand. I didn't want to just lay them all out on a platter, so after looking at cupcake stands on Amazon I looked for tutorials on making your own.  I didn't follow a specific tutorial, because I decided to go the easiest route possible. A trip to the Thrift store scored me all the materials for about $10 - three white plates (one a little smaller than the other 2), 2 candlesticks, and a little class dish for the base.


Assembly was super easy - I just put the E6000 on the bottom of the glass dish and stuck it on the bottom of one of the larger plates, then did the same for each of the candlesticks.


After drying for a few hours, I put glue on the other end of the candlesticks and stacked the plates into 3 layers. Dry overnight and voila!  But actually I was glad I made it a week early because the E6000 took a couple of days more before the smell was not detectable.
And here it is loaded up with cupcakes!

The dessert table looked awesome! I made the banner by printing the letters on yellow cardstock and my mom strung a ribbon through two holes in the tops to hang it.
Teen Wonder and my mom made the sugar cookies, and I made the little grad caps using mini PB cups and little dark chocolate wafers (there are a few tutorials out there about these caps too - not my own invention!)

And how much fun is it to order custom M&Ms? A lot!
Lots of good food, lots of balloons, and a little crepe paper made up the rest of the party prep indoors.
Outside to greet people were more balloons (including a mylar bouquet that attacked guests when the wind gusts came through), and my mom (calligraphy artist) decorated the front window with window chalk markers.  I made a Class of 2012 flag with a scrap of muslin, and iron-on design made in Word, and some Washi tape.

Finally - when the open house started and no one was here yet, we broke out the photo albums and champagne and had a few minutes to relax! 

 I do wish I'd taken a photo of the punch bowl too - I made punch with orange sherbet, tropical juice blend, and sprite - it was a HUGE hit!
Since it's Friday - let's link up!

and TGIFF at Sparrow in Flight this week

Sunday, June 17, 2012

The J Bag - a beloved sweater re-purpose project

Edited on Friday June 22nd with a J. sweater "before" picture! How fun is that?  And since it's now Friday and I'm under the weather I'm going to some linky parties at the end of the post too!

Last weekend I finished this bag. It's been crazy around here, and I actually became obsessed with finishing it I think because I had so much stress about Teen Wonder's graduation and party plus all the end of year activities with Wild Thing's school, baseball team, etc. But also it had to be really awesome because this isn't just any bag. This was a sweater re-purposed. And not just any sweater - but a sweater made by a good friend. A sweater made with love and numerous hours and lovely Icelandic wool yarn. My college room-mate J. made this sweater for me back in the mid-80s. I thought I took a "before" photo of it, but haven't located it yet. If I do I'll amend the post to include it.  But I'll tell you it was big and roomy (and I'm not small!), with a shawl collar, and it was covered in bobbles (those things are not easy either - well, at least they are way time consuming to knit).
The J. Sweater before - the lighting is a bit green because the photo was taken in our basement right under the fluorescent lights. But you can see the amazing work it took to knit this up!
The thing is, after I moved to California in Fall, 1988, I probably could count on one hand the number of occasions that I could wear this sweater. My sensitive skin meant that I had to wear a full turtleneck underneath, and did I mention it was nice Icelandic wool?  I think I took it to the mountains a few times and played in the snow fully warm and protected from snowballs in this sweater.  But I rarely traveled with it even when I went places I could use it because it was pretty bulky to pack.  But no way could I get rid of such a special gift!
After I learned to knit in 2004 and also learned about felting, I wondered if there would be some way to convert all the lovely knit fabric of the sweater into something else. I made a couple of felted purses, and liked how the knit fabric transforms to a strong bag worthy material. But I didn't have the nerve to suggest this to J. until I had some clear idea how it might look like.  Anyway, this bag design emerged after felting the sweater and spending a few months looking at it and trying to imagine how it would look in various forms before I would even make a single cut. And now this is the end result:


I cut the sleeves off first, and then opted to flip the sweater upside down and make the ribbed bottom band of the sweater the upper edge of the bag. I ended up cutting the sweater at the arm pits, and I snipped out the collar to use for the purse flap.  I did a modest box shape at the bottom corners of the bag to give it some shape.


The handles and lining were constructed using some ultra-suede leftover from my dining room re-upholstery project back here. I will say that I probably wouldn't opt to do this again even though I love the look. I just don't have an industrial strength machine, so multiple layers of ultra-suede and felted wool were extremely hard on my machine. And my fingers!
Inside there is a full zipper divider pocket, so the bag can be more or less a zippered bag with my wallet and any other valuables. I added a smaller patch pocket inside with a pen slot and space for notebook and cell phone. 


I love the look of the hardware details on the handles, and there is a magnetic snap in the flap.  The flap looked nice alone - the angle at the bottom of the ribbed flap is a nice detail. But still a little unadorned, so I made a little fabric flower to finish off the look.


I hope J. will approve - there are a lot of mistakes that I learned from, but none that diminish the end result significantly.  It's a good size for a laptop or folio and books. It's less suitable to a number of fat lumpy things just because the depth of the bottom is not very large. It's also seasonable most of the year here in the Bay Area.

And there is still some bobbly felt that I may be able to use in a second smaller bag or something!

I am entering this bag into the Purse Palooza over at Sew Sweetness . If you are a fan of hand-crafted purses and bags, check it out!


Friday Linky parties!
 at Pretty Bobbins this week


Friday, June 1, 2012

Friday Finish - Fat Geese in all their glory!

YES! I finally finished binding this quilt and put it through the wash.
I. love. this. quilt.


I remember spending so much time with graph paper and colored pencils agonizing over the design when I started this quilt.. I wanted to use the warm HSTs and the cool ones to create a ziggy sense of movement across the quilt. I was really happy when I finished the top way back when, because I really felt like I'd gotten the effect I was looking for. I didn't come up with the pattern - I took it from a Fat Quarterly Zine - Issue 1 (see original below). It was designed by Katy at I'm a Ginger Monkey.  It's a fun way to arrange HSTs to make these large flying geese - and you can see there are a number of ways to design with different fabric and quilting choices.

Fat Geese on a fence Fat Geese - detail

I used a zigzag quilting pattern for my version - I'd like this think I decided on this to enhance the ziggy color movement, but I think it just seemed like a fun way to shadow quilt along each side of the HST seam lines.  The back is made simply with two pieces of flannel from the Wee Woodland fabric line - the majority of HSTs also use charms of the same line, but there are quite a large number of other things mixed in there from my stash of scraps and charms.

I think that upside down you get a more zigzag feeling, but maybe I'm just smitten with the quilt from any angle.
Gratuitous close up shots. I like the little bunny. There are lots of little "I spys" in this quilt like that, though I didn't do any real fussy cutting.


Happy Friday to everyone!  I'm linking up with the usual suspects, so visit these parties and check out some more eye candy on the web!