Saturday, January 28, 2012

Put a pin in it!

One cute little project I've been meaning to make for ages.  A pin cushion!  Now I realize that I need at least a couple more.


Nothing like a little instant gratification, right?  Whoop Whoop!

I've been busy getting life back in order after being sick so much in the past 3 months - work, home, husband, kids - every piece of my life has been pretty neglected. I have a long list of home and craft projects - but some have to take priority. Like making these heart shaped crayons for Wild Thing's class valentine. We need 26 of them, so our thumbs are sore from peeling paper off broken crayons.  

There are several tutorials on the web of how to melt pieces of crayon in a mold to get multi-colored crayons in fun shapes.  The one we used is on FamilyFun.com: http://familyfun.go.com/valentines-day/valentines-day-cards/crayon-hearts-671639/


We'll need to smooth the back edges by rubbing on paper, then pick a valentine message to put on card stock, and stick the hearts on. But we'll do that another day.

I found the molds at IKEA yesterday. I also bought some stuff to help organize my craft space - it is a complete mess!  And while I was browsing through the fun fabrics they have (I was good and didn't buy any this time!) I found some curtains for Teen Wonder's room.  I don't have a before picture, but it would have just been darkness anyway. The heavy denim curtains were still there from when it was Wild Thing's nursery, and when we replaced all our windows with new energy efficient ones that matched the style of the house better than '70s single pane aluminum sliders, the awesome (and expensive) custom shade for that window wouldn't fit.  Teen Wonder kept the dark curtains shut ALL THE TIME and that bedroom gets the best light of the 3 we have. She said she didn't like the "no privacy" feeling when they were open.  Well, I cut them to length and hemmed them and pressed them and hung them up before she got home as a surprise.  She loves them, and even closed completely, some light comes through. They are double layer, so she can put back only the print panels and have night filtered light.  So today, what do I see?  They are totally open!

Teen Wonder - a wonderful mystery to us all!

Add caption

Tuesday, January 24, 2012

True Blue cowl to warm in this stormy weather

Another catch up post...

so, I had 3 balls of this squishy blue Debbie Bliss Como yarn and thought it would make a nice cowl - I'm seeing more and more of this style (i.e. cowl vs scarf). Yay Ravelry - I love Ravelry.  After some searching through the pattern database I found a pattern for this mobius cowl made from the same yarn!

The stitch was an interesting one - I noticed that some knitters used a traditional seed stitch, and I almost started over to do that at one point, but I decided to stay with the pattern as written. I like that the cowl is "reversible" but not the same on both sides.  


Attempt at self portrait - I never see my family in the daylight hours during the week and on the weekend I always forget to ask Mr. Wonderful to take a pic.  But self pictures are pretty common among knitters, so I'm in good company there. 

The seaming was interesting too - a three needle bind off.  I thought about  Kitchener stitch, but again went with the pattern.  I really like the different textures of this piece with the two sides and also the rib formed by the seam.


Below is a more close look at the stitches.  I really like how it turned out, and it is so snuggly and warm. It's a bigger "profile" around my neck than I'm used to, but it works.  I knit this up while traveling to Seattle, Olympia, and Portland to visit colleges for Teen Wonder and to see some family (briefly).  It was snowing when we left but we really got out in just the knick of time last week!


Wednesday, January 18, 2012

Another belated Christmas gift - colorful tote bag

Here is the second project I made for someone for this Christmas - I haven't even given it to her yet!  It's for our afterschool care provider - she's been taking care of Wild Thing since he was a wee babe, and along with her husband they are extended family more or less. They took care of Teen Wonder too and have known us for more than 10 years now.

She's also crafty, and we like to give them a little end of year bonus check but usually also a handmade gift - and normally it's something that I've helped Wild Thing make, but this year that just didn't happen due to circumstances beyond all control.

I still wanted to make something special for her because they are so generous and we trust them with our most precious family treasures - our kids!


I used laminated cotton scraps leftover from my kitchen chair makeover for the exterior (Michael MIller print I think), and the interior is a decor weight cotton that's been in my stash for a long time (Valori Wells). I also used a fusible interfacing on the exterior pieces and squared up the bottom so the tote can stand on it's own.


 The lining has 2 pockets and a snap hook for keys or whatever.  I used strips of batting to pad the straps for more comfort toting books around!


I sure hope she uses the bag - it sounds like our other gifts in the past get put on a shelf sort of shrine fashion or she's afraid to get them dirty or worn out.  

But I like my gifts to get worn out!  Then I can make more with some justification!

Tuesday, January 17, 2012

FO's in the face of repeated bouts of illness - I will persevere!

I know it's halfway through January already - but Happy New Year!

I haven't gotten too much crafty goodness accomplished in the past couple of months.  It's just been...well...rough around here.  My body just can't seem to get the message from my brain that I have better things to do than be sick and sleep and rest.  I haven't even dared yet to put any resolutions for the new year to paper...but perseverance will be my motto, and health my main goal.  Since making stuff makes me happy, I want to continue as much as possible - but the late night sessions will need to be curtailed so I won't be as productive, I'm imagining.

blah blah blah...I only made a couple of Christmas gifts this year as a result of all that stuff - and overall, that is okay. I don't have so very many crafty friends or family who really are impressed by handmade (sadly). My immediate family get these types of gifts as they roll off the needles, so they are understanding. But I do have a few people I like to make things for to go along with a charitable contribution "gift" at Christmas. For example, the only thing my mom asked for was another zippered pouch - I had made her a Noodlehead Gathered Clutch last year and she liked it so much she found herself wanting zippered pouches for other uses like carrying a little notebook and such.

I think you can never have too many zippered pouches - do you?

Since mom was here over Christmas, I snuck in a pouch just under the wire - I used Keyka Lou's pattern for a zip pocket pouch. I think it turned out pretty well - it was hard to know the first try where to place the applique so the pouch would fold up correctly but I came pretty close.


The Applique is from Meringue designs - I love her modern embroidery patterns!


I have all this denim from some old curtains in Wild Thing's room before it became Teen Wonder's room - endless amount of fabric! (IKEA curtains originally - they were so long!)

Here's the pouch opened up - it has a pocket to slip a notebook into (a little one), and a zippered pocket.  I think this would make a perfect small wallet and plan to make more of these.  The lining was a random FQ from my stash - I don't remember where it came from.

Mom seems happy with it - I was in such a rush to get it finished before she left that I totally forgot to take any photos - so thanks mom for sending these pix!


I have at least 3 other little projects that I've finished recently too...but no photos yet. So stay tuned...for the moment I'm healthy-ish and back at work. I'd like to get more blogging in too!

Friday, December 2, 2011

Dining room chair upholstery craziness!

We used to have a cool old antique table and chairs that I bought in a hormone daze during one of my ill-fated pregnancies. It was ill-fated enough that the dining set never "took" either - the top was not durable enough for our crazy family and we don't have a separate "everyday" table - we eat there every day at dinnertime.  Then the chairs started falling apart. Wild Thing liked to stick his fingers through the antique rattan backs and make holes (sounds fun if you are 14 months old, huh?). Our American sized family members and friends would occasionally get a scare from the creaky smallness of the chairs. And I just didn't have good mojo with the set - though I didn't realize that until we got rid of it. We gave it away to a woman who was thrilled to rejuvenate it and give it a good home. yay!

So we went to a sale at Macy's and bought a brand-new table and set of 6 chairs.  We'd checked them out and liked them a lot. Then when they went on sale at, like, 40% off - well you all know how that works. This was a few years ago. I want to say 5 years?  At the time I remember saying to Mr. Wonderful that the only problem was the seat upholstery. "But it's ultrasuede!" he says..."the only thing our cat won't shred into threads over a weekend!". True dat.  But it was cream colored - or more of a very light taupe. It's hard to remember for sure you see, because they got so dirty I didn't even take a "before" photo.  Although I did save the piece I used as a template for the new covers as Exhibit A: (oh, the shame...)


In fairness, there were a couple of chairs that were not that bad. Like the 2nd armchair that we keep in our bedroom since we don't have a large enough dining room for it on a daily basis and besides, Mr Wonderful needs a place to throw his khakis at the end of the day. And this one looks particularly hideous, so it was probably the seat Wild Thing sat in, but I'm not sure. They were mostly pretty bad.

And I tried. I Scotchguarded. And I cleaned them a couple of times and bleached them in the sun.

But at the time we bought them I remember telling Mr. Wonderful that I would have to recover the seats at some point because white or cream or light taupe just doesn't work for dining chairs you use everyday. Especially if there are children involved. At least in our family where no one bothers to pull the chairs out after meals and make sure there isn't sauce and noodles and milk and wine and chunks of pork chop stuck to them. Who has that kind of time? (I know. You all probably do that kind of thing, but we didn't and look where that took us!)

I searched and searched for some interesting print that wasn't too interesting for Mr. Wonderful and a general aesthetic.  I seriously considered a cotton laminate, which has worked so wonderfully for our kitchen chairs (where we do eat breakfast in our little nook since remodeling the kitchen). But vinyl seats in the dining room was not a place I could go - even a designer cotton laminate. But I really mulled that over a long time...

It's true that ultrasuede works best with our cat (we have 2 cats, but only one bad shredder cat - the other one just barfs everywhere which is another home dec challenge in itself).  But I couldn't decide on a color. Then very late one night while browsing ultraseude on fabric.com I had this thought that the chairs could be all different colors. Maybe to pull colors from the rug underneath (which now looks all spotty and dirty, so getting that cleaned professionally is next on the list I guess!).

I think this works.


The blue one is not actually that bright in real life - a more bright navy rather than indigo...but you get the idea.  The colors really do pull from the rug nicely and they are all dark enough to mask more dirt/stains than the white/ivory/light taupe color.  I need to buy a can of Scotch Guard to be on the safe side though.

Some notes on the actual project execution: 1) I have done this at least 3 times before with old chairs, and the process was much more challenging with new chairs.  The industrial staple machine they must have used made the staples impossible to pull out easily.  After the first chair, I actually just ripped the piping out and removed the black covering to reuse - then just stapled the new fabric right over the old fabric and added new piping.  I don't think there are any oily stains that will seep through - I tried to spot any - but that is a risk I think with just recovering rather than removing the old fabric.

Also my first experience with this type of piping - okay, who am I kidding? I've used piping exactly twice for a project, ever.  Anyway, I just made the piping with 2 inch strips and cording, then stapled it along the edges and covered the raw edges with the salvaged black netting fabric (whatever that stuff is called).  Don't look to close and it pretty much approximates the original piping look that the chairs had.  If I'd had a print that I decided to use I may have skipped this altogether, but with the ultrasuede it's a nice detail.


It's been forever since I've linked up to Sara's Whoop Whoop Friday, but I'm home with a sick boy on what was supposed to be my day off anyway...so let's Whoop it up!


Friday, November 25, 2011

A Fall bag all my own to Celebrate Color!


A few weeks ago, I thought to myself "self - you should pick a couple of fabrics from your stash and try out that free bag pattern you saw awhile back. The one that's reversible, just 2 pieces kinda dumbell shaped to make the bag and handle all at the same time." The construction intrigued me - so simple, but I couldn't quite picture it until I tried it out.


Well...that simple thought turned into a much bigger process of making a bag that I would actually use myself as a handbag. But first I started with some recycled denim curtains and a bright Valori Wells deco weight cut from my stash as the lining - oranges of course.   What speaks Fall color more than denim and orange with some brown ultrasuede thrown in for good measure (the ultrasuede has a separate story as you'll see).

I used a basic pattern as the springboard that I printed off of All People Quilt (can't seem to find it on their website anymore!)

Then fused some interfacing to the denim and did a little scribble embroidery to echo the orange print.  I chose several vintage buttons to sew onto this weedy flower (my favorite kind of flower!) - most of which came from my grandmother's stash (of which I procured a fraction after her passing a year ago).


My favorite button from her stash on this bag is on the back by my signature - I remember her collecting owls when I was little. Then it was roadrunners...after that who knows. But the 70s Owl collection is still my favorite memory of those little vignettes. And I have proof of the owl collection right there! Because other than stashing fabric (which she did with a hoarders obsessive way), Grandma tended to get rid of stuff rather unceremoniously at random - or at least that's how it felt to a youngster.


Anyway, I added a pocket and a U-ring tab just in case it would ever come in handy to the lining.


And all would have come together peachy except I messed up the final construction steps, boxed my corners on the wrong sides, and had to do a fair amount of ripping back and adding a bit onto the bottom to fix it.  That was where the ultrasuede hit me - not only to extend where I'd cut and messed up, but it would add a nice bottom to the bag. I like it!

Last problem that had to be solved - I didn't like the way the bag gaped open unless it was tucked neatly under my arm (like only happens about 12% of the time). I couldn't find two halves of a sew-in snap in my stash, and so I surgically inserted a magnetic clasp. I would not recommend this method - for a variety of reasons - not the least of which is that the heavier side could probably use more reinforcement behind the prong attachment. But so far so good.

It's fun to pull off a pattern or concept without a hitch - but it is true that you learn more from making mistakes while constructing projects.  And this one was customized every hitch of the way to make it more fun (in my opinion) - and somehow doesn't distract from the overall workmanship impression anyway.  It's a solid bag, and fun to carry!

So, I'm slipping this in last minute to Celebrate Color! for November over at Stitched in Color!


Celebrate Color


Wednesday, November 2, 2011

Bloggers Quilt Festival entry - the Christmas Quilt!

YAY! I finished this quilt in time to enter into the Blogger's Quilt Festival!

So just a year later than I had intended - not so bad I guess.

Although the quilting wasn't as nice and smooth as I would have liked, the overall effect after washing the quilt is nice. I'm pretty happy with it and it won't be long before it'll be draped over the sofa for the holidays!


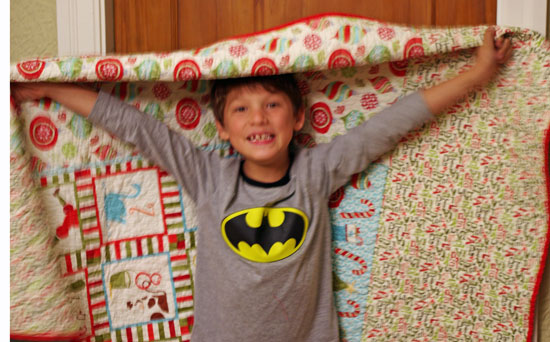
I used a layer cake of Kate Spain's 12 Days of Christmas plus an aqua solid for the front.  The pattern was called "Piece of Cake (2)" by Thimbleblossoms.  It was pretty much a piece of cake to put together.


I pieced the back to include the 12 Days of Christmas Panel and 2 of the prints (the top and bottom say Fa la  la la la...). The binding is from the red swirl print in the collection.  I think this is only the 2nd time I've made an entire quilt using only fabric from a single collection.  


And the final touch? The Wild Thing seal of approval!


So head over to the Blogger's Quilt Festival at Amy's Creative Side - yowza! There are more than 500 entries!