Friday, December 2, 2011

Dining room chair upholstery craziness!

We used to have a cool old antique table and chairs that I bought in a hormone daze during one of my ill-fated pregnancies. It was ill-fated enough that the dining set never "took" either - the top was not durable enough for our crazy family and we don't have a separate "everyday" table - we eat there every day at dinnertime.  Then the chairs started falling apart. Wild Thing liked to stick his fingers through the antique rattan backs and make holes (sounds fun if you are 14 months old, huh?). Our American sized family members and friends would occasionally get a scare from the creaky smallness of the chairs. And I just didn't have good mojo with the set - though I didn't realize that until we got rid of it. We gave it away to a woman who was thrilled to rejuvenate it and give it a good home. yay!

So we went to a sale at Macy's and bought a brand-new table and set of 6 chairs.  We'd checked them out and liked them a lot. Then when they went on sale at, like, 40% off - well you all know how that works. This was a few years ago. I want to say 5 years?  At the time I remember saying to Mr. Wonderful that the only problem was the seat upholstery. "But it's ultrasuede!" he says..."the only thing our cat won't shred into threads over a weekend!". True dat.  But it was cream colored - or more of a very light taupe. It's hard to remember for sure you see, because they got so dirty I didn't even take a "before" photo.  Although I did save the piece I used as a template for the new covers as Exhibit A: (oh, the shame...)


In fairness, there were a couple of chairs that were not that bad. Like the 2nd armchair that we keep in our bedroom since we don't have a large enough dining room for it on a daily basis and besides, Mr Wonderful needs a place to throw his khakis at the end of the day. And this one looks particularly hideous, so it was probably the seat Wild Thing sat in, but I'm not sure. They were mostly pretty bad.

And I tried. I Scotchguarded. And I cleaned them a couple of times and bleached them in the sun.

But at the time we bought them I remember telling Mr. Wonderful that I would have to recover the seats at some point because white or cream or light taupe just doesn't work for dining chairs you use everyday. Especially if there are children involved. At least in our family where no one bothers to pull the chairs out after meals and make sure there isn't sauce and noodles and milk and wine and chunks of pork chop stuck to them. Who has that kind of time? (I know. You all probably do that kind of thing, but we didn't and look where that took us!)

I searched and searched for some interesting print that wasn't too interesting for Mr. Wonderful and a general aesthetic.  I seriously considered a cotton laminate, which has worked so wonderfully for our kitchen chairs (where we do eat breakfast in our little nook since remodeling the kitchen). But vinyl seats in the dining room was not a place I could go - even a designer cotton laminate. But I really mulled that over a long time...

It's true that ultrasuede works best with our cat (we have 2 cats, but only one bad shredder cat - the other one just barfs everywhere which is another home dec challenge in itself).  But I couldn't decide on a color. Then very late one night while browsing ultraseude on fabric.com I had this thought that the chairs could be all different colors. Maybe to pull colors from the rug underneath (which now looks all spotty and dirty, so getting that cleaned professionally is next on the list I guess!).

I think this works.


The blue one is not actually that bright in real life - a more bright navy rather than indigo...but you get the idea.  The colors really do pull from the rug nicely and they are all dark enough to mask more dirt/stains than the white/ivory/light taupe color.  I need to buy a can of Scotch Guard to be on the safe side though.

Some notes on the actual project execution: 1) I have done this at least 3 times before with old chairs, and the process was much more challenging with new chairs.  The industrial staple machine they must have used made the staples impossible to pull out easily.  After the first chair, I actually just ripped the piping out and removed the black covering to reuse - then just stapled the new fabric right over the old fabric and added new piping.  I don't think there are any oily stains that will seep through - I tried to spot any - but that is a risk I think with just recovering rather than removing the old fabric.

Also my first experience with this type of piping - okay, who am I kidding? I've used piping exactly twice for a project, ever.  Anyway, I just made the piping with 2 inch strips and cording, then stapled it along the edges and covered the raw edges with the salvaged black netting fabric (whatever that stuff is called).  Don't look to close and it pretty much approximates the original piping look that the chairs had.  If I'd had a print that I decided to use I may have skipped this altogether, but with the ultrasuede it's a nice detail.


It's been forever since I've linked up to Sara's Whoop Whoop Friday, but I'm home with a sick boy on what was supposed to be my day off anyway...so let's Whoop it up!


Friday, November 25, 2011

A Fall bag all my own to Celebrate Color!


A few weeks ago, I thought to myself "self - you should pick a couple of fabrics from your stash and try out that free bag pattern you saw awhile back. The one that's reversible, just 2 pieces kinda dumbell shaped to make the bag and handle all at the same time." The construction intrigued me - so simple, but I couldn't quite picture it until I tried it out.


Well...that simple thought turned into a much bigger process of making a bag that I would actually use myself as a handbag. But first I started with some recycled denim curtains and a bright Valori Wells deco weight cut from my stash as the lining - oranges of course.   What speaks Fall color more than denim and orange with some brown ultrasuede thrown in for good measure (the ultrasuede has a separate story as you'll see).

I used a basic pattern as the springboard that I printed off of All People Quilt (can't seem to find it on their website anymore!)

Then fused some interfacing to the denim and did a little scribble embroidery to echo the orange print.  I chose several vintage buttons to sew onto this weedy flower (my favorite kind of flower!) - most of which came from my grandmother's stash (of which I procured a fraction after her passing a year ago).


My favorite button from her stash on this bag is on the back by my signature - I remember her collecting owls when I was little. Then it was roadrunners...after that who knows. But the 70s Owl collection is still my favorite memory of those little vignettes. And I have proof of the owl collection right there! Because other than stashing fabric (which she did with a hoarders obsessive way), Grandma tended to get rid of stuff rather unceremoniously at random - or at least that's how it felt to a youngster.


Anyway, I added a pocket and a U-ring tab just in case it would ever come in handy to the lining.


And all would have come together peachy except I messed up the final construction steps, boxed my corners on the wrong sides, and had to do a fair amount of ripping back and adding a bit onto the bottom to fix it.  That was where the ultrasuede hit me - not only to extend where I'd cut and messed up, but it would add a nice bottom to the bag. I like it!

Last problem that had to be solved - I didn't like the way the bag gaped open unless it was tucked neatly under my arm (like only happens about 12% of the time). I couldn't find two halves of a sew-in snap in my stash, and so I surgically inserted a magnetic clasp. I would not recommend this method - for a variety of reasons - not the least of which is that the heavier side could probably use more reinforcement behind the prong attachment. But so far so good.

It's fun to pull off a pattern or concept without a hitch - but it is true that you learn more from making mistakes while constructing projects.  And this one was customized every hitch of the way to make it more fun (in my opinion) - and somehow doesn't distract from the overall workmanship impression anyway.  It's a solid bag, and fun to carry!

So, I'm slipping this in last minute to Celebrate Color! for November over at Stitched in Color!


Celebrate Color


Wednesday, November 2, 2011

Bloggers Quilt Festival entry - the Christmas Quilt!

YAY! I finished this quilt in time to enter into the Blogger's Quilt Festival!

So just a year later than I had intended - not so bad I guess.

Although the quilting wasn't as nice and smooth as I would have liked, the overall effect after washing the quilt is nice. I'm pretty happy with it and it won't be long before it'll be draped over the sofa for the holidays!


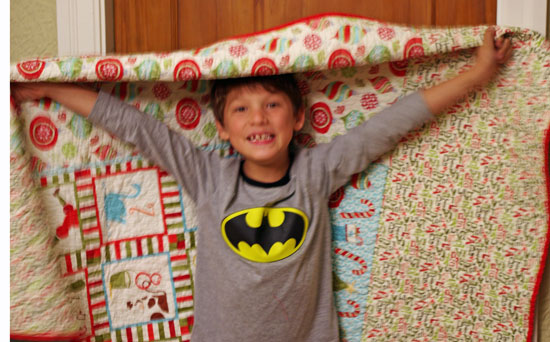
I used a layer cake of Kate Spain's 12 Days of Christmas plus an aqua solid for the front.  The pattern was called "Piece of Cake (2)" by Thimbleblossoms.  It was pretty much a piece of cake to put together.


I pieced the back to include the 12 Days of Christmas Panel and 2 of the prints (the top and bottom say Fa la  la la la...). The binding is from the red swirl print in the collection.  I think this is only the 2nd time I've made an entire quilt using only fabric from a single collection.  


And the final touch? The Wild Thing seal of approval!


So head over to the Blogger's Quilt Festival at Amy's Creative Side - yowza! There are more than 500 entries!

Tuesday, November 1, 2011

198 yards of loveliness...

In honor of the colors of fall, I give you my first official "lace" project. 

This is a color I always gravitate to in the fall, along with oranges and greens - the berries last in, grape harvests, deep red wines. I love the light of the days during this time of year the best. 

This pattern is called "198 yds. of Heaven" by Verity Knits on Ravelry.com .  I found the pattern looking for something to make with these 2 skeins of cranberry Noro Cash Iroha (yum!).  I ran out before the pattern called for, tried to bind off in time, and then had to do something creative with 3 strands of kidsilk haze in the same color, but over all I'm really pleased with this little shawlet. 

I've done some "easy" lace patterns before with basic repeats, but so far a but chicken to try the real charted patterns (ADHD?).  Plus I really really had no idea how one blocks lace. Blocking to me is getting a sweater nice and sudsy, rinsing gently, rolling in some sweaters to get the extra water out and then painstakingly shaping and reshaping the sodden mass into your lovelly measured sweater shape. 
That works, right?  That's what it says in Stitch and Bitch, and that's what I'm sticking to~

So here, I found a rack big enough to stretch it over, then I pinned like crazy!


Every little point got pulled and pinned...

And pretty much every yarn over required opening up and pinning every here and there to stay in a nice lacy way. Pretty fun in the end because the result looked so much more polished than I expected!


Go checked out Stitched in Color - there's been a color party going on since September - I'm just a little late to join with the goods!


Celebrate Color

Saturday, October 29, 2011

I need a little baby for a little fall stroller blanket

Just kidding - I need a little baby of my own like I need another hole in my head!  But I need to think of one that we know who might like a little stroller blanket now that the days are getting crisp.


The photo is an optical illusion - the blanket is only at 22" x 28" but I draped it over this miniature garden bench we have in the backyard (you know, for when we have miniature guests at our numerous barbeques!)  The story of this blanket is that I had all these different partial skeins of cotton-ease and other cotton-y yarns in my scrap stash of yarn. I thought I'd have enough to do a sort of random garter square patchwork - pretty much like what you see here.  I still have a little of a couple of colors left, but did use something that I would have eventually stuffed in a bag and either squirrelled it away where I wouldn't have to look at it or given it to our care provider, who has a magical way of incorporating random bits of crafty stuff into activities for the kids. No kidding - she's magical.

I have a couple of other knitting projects on the needles at the moment and some things queued up - but I'm trying to finish off UFOs and stash yarn only for awhile.

Actually - I'm also going on a fabric diet - my obesity issues with fabric are greater right now than yarn. So I'm quilting away when I have at least 15 minutes at a time on the Christmas quilt:

It would be great to finish in time to enter in the Blogger's Quilt Festival happening right now, but I don't know if I can finish quilting and bind it by next Friday.  If not, I'll find another quilt to enter - I love the BQF at Amy's blog!

Have a great weekend and a fun Halloween!

Tuesday, October 25, 2011

Do home projects that your husband did count as crafty?

Well, I'm posting about this bike rack anyway, because it was my idea and it came out so well!

We recently spent too much money rebuilding our garage.  Our garage was in such bad shape that the assessor for our home value when we bought our house didn't even count it as any value at all. He joked he should take something off since we'd have to tear it down.

For more than 10 years, Mr. Wonderful crippled that garage along to act as a storage place for a great number of things. But it was disgusting - dark, leaky, rotten wood, full of black widow spiders kind of bad. And Mr. Wonderful has never had even a workbench to call his own around here. Our house is pretty small for a family of four and without a garage there just wasn't anyplace to put hobby stuff for him besides nooks and crannies in the basement and the leaky, rotting, falling down garage. Poor man.

Now we have a shiny rebuilt garage with electricity, lighting, and even drywall!  Not only that, but our contractor "finished" a part of the walk-in crawl space with a nice concrete pad for just another grand (notice how it's always multiples of $1000 for any change order?)  I call it our "sub-tic" because not only is our house small, it doesn't even have an attic for storage of things like Christmas decorations or camping equipment.  We'll have to keep the storage locker at least for now, but this does open up a lot of possibilities.

What do we not have? Money to outfit this shiny garage with.  But one of the main space-sucking things we need to store in there are bicycles.  When it's nice, the bikes in use at any given time get locked up in the backyard with this  - a brilliant little latching post made out of plumbing parts (Mr. Wonderful is just so clever).


Okay remember at the beginning when I said the bike rack was my idea?  No, it was not my idea - I found it on the internet of course!  At instructables.com to be precise...

I went in search of space-saving bike storage  on the world wide web, and came across this:

Nifty huh? Couple of 2 x 4s, a bunch of long wood screws, and a bunch of big hooks.  That's it (except for the work of putting it together which I gather was relatively simple in the world of home improvement projects).

The hooks are cleverly staggered
I think this baby holds 6 bikes in all.
 

Just a view from the door.  Basically what you see is what you get - there isn't a vast space over to the right or anything.  There will be a workbench or two though, and this bike solution rocks the space utilization!

Friday, October 21, 2011

bumpy roads lately, but a couple of WIPs worth mention

hoooey!
I can't just get a little bout of the 24 hour "flu" like some folks huh?  now, why is that?  Last Sunday I started feeling a little feverish and just "yucky", but not overtly sick. Went to work Monday, and then had to hoof it home trying to be safe on the freeway while keeping myself together, if you know what I mean!.  This episode felt an awful lot like last December in Switzerland. The one where Mr. Wonderful finally had to com fly me home via our travel insurance service (still have to plug MedJetAssist! if you travel even more than a few hundred miles away from home it is sooooo worth it!).  I have this one sad commentary on the whole teeny Swiss Hospital where they didn't know what to do with me vs. our system of putting people in ER, no continuity to a single point of contact, release after a few hours with unclear and unaffective regimen of medication, then repeat 48 hours later...it turns out the same.  The same.  Except for the plane flight and stress of being across the world

Okay, got that out of my system.  I actually started a new blog today in which I will attempt to take control of my own health using this rock bottom place as a starting point.  Feel free to check out "Janet's Self Help Book" at http://gardenvarietydiabetic.blogspot.com/  But there won't be any crafting on that blog unless it's cool stuff to make with the freebies you find in your exam room while you wait in 30 minute increments.

In which case I will cross-post (can you do that? I never had 2 blogs before).
---

AND NOW BEHOLD IN ALL IT"S UNFINISHED GLORY.....THE TEEN WONDER T=SHIRT QUILT! (this is in all caps because I have a little Monty Python score playing in my head while I write it...teee deeee!  booom booom bom bom bom. crash)


Sad that I can't go outside an take a decent photo, but I still look like hell warmed over. And anyway, you can get the idea of it's overall magnificence even cropped.  The overall size is something like 59" x 78".  I'll ask Teen Wonder if she had some specific use in mind, but I doubt it.

I really wish I'd take photos of the pile of shirts and then the pile of scraps with not even enough for a seam allowance after she agreed to "what the lump, i'll just cut 'em out for you if it such a bunch of work". Then I went back and salvaged a few I figured she might like to see someday even if she doesn't think so now. There is a lot of ad hoc piecing here my friends!

Since TW can wait until Christmas for this, or even as a Grad present, I folded it neatly, made an attempt at tidying up the craft area and decided to tackle another space hog - the Christmas quilt.  Remember this quilt?

We'll I basted with pins on my dining table in halves.  I used these funky rubber tips for regular pins instead of saftety pins, so we'll see how that comes out.  Anyway, once I'm back to something a little normal and caught up in the backlog of work, maybe I can start some FMQ on this project!

Go Whoop it up at Sarah's Linky - and here's to good health for all of you!  http://confessionsofafabricaddict.blogspot.com/2011/10/can-i-get-whoop-whoop-lazy-week.html